What is the Raspberry Pi AI Camera, and is it worth it?
The Raspberry Pi AI Camera is a $70 camera module built on Sony's IMX500 sensor, which runs a neural network on the camera itself and sends the results, such as boxes and labels, to the Pi. It works with every Raspberry Pi model, needs no AI HAT, and suits one private smart camera.
This page is part of our guide to AI on a Raspberry Pi 5, which sets the camera beside chat models, voice projects and the AI HATs.
This guide follows one reader: a hobbyist with a Raspberry Pi 5 who wants a camera that recognizes people, pets or garden visitors and saves a clip when it does, without sending video to a cloud service. They can paste terminal commands but have never trained a model.
Choose the AI Camera if:
- You want one smart camera and own no camera yet: it has the same $70 list price as the 13 TOPS AI HAT+, which still needs a camera.
- Your Pi is older than a Pi 5. AI HATs are add-on boards for Raspberry Pi 5, while the camera's demos run with the same inferencing performance on a Raspberry Pi Zero.
- People, cars, cats, dogs, birds and the rest of the 80 everyday COCO classes cover your project.
Choose an AI HAT+ instead if:
- You need bigger models or several cameras. Raspberry Pi says even its older 13 TOPS AI Kit has higher theoretical performance than the AI Camera, and can support a broader range of models. Our AI HAT+ buying guide compares the boards.
- You also want a small chat model. Only the AI HAT+ 2, with its own 8 GB of onboard memory, runs language models.
Stick with the Pi's own processor if:
- You already own a Camera Module 3 and do not mind building software: Raspberry Pi's CPU detector, rpicam-detect, is not included in Raspberry Pi OS, so you compile it with TensorFlow Lite.
Raspberry Pi AI Camera specs and price in October 2026
Raspberry Pi says the camera will remain in production until at least January 2028. Specs come from the AI Camera product brief, plus the weight from Raspberry Pi's camera comparison table and the flash size from the launch post.
| Spec | Raspberry Pi AI Camera |
|---|---|
| Sensor | Sony IMX500, 12.3 megapixels, 1/2.3 type (7.857 mm) |
| Camera modes | 2028 × 1520 at 30fps (2×2 binned); 4056 × 3040 at 10fps |
| Lens and focus | F1.79, 4.74 mm; manual focus, 20 cm (8 in) to infinity |
| Field of view | 66.3° horizontal, 52.3° vertical (±3°); the product page's 78.3° (±3°) names no axis and roughly matches the diagonal |
| Memory for AI | 8,388,480 bytes for firmware, weights and working memory |
| Largest model input | 640 × 640, int8 or uint8 |
| Infrared | IR cut filter built in; not infrared sensitive |
| Size and weight | 25 × 24 × 11.9 mm; 6 g |
| Cable | 200 mm ribbon; 15 × 1 mm or 22 × 0.5 mm FPC connector |
| Operating temperature | 0°C to 50°C (32°F to 122°F) |
| Controller | RP2040 microcontroller; 16MB flash caches recently used models |
| US price | $70 list, unchanged since launch; $74.95 at PiShop.us on October 27 and 28, 2026 |
What does on-sensor AI actually mean?
Inference means running a trained model on new data, here each video frame. Normally the Pi receives the picture and runs the model itself or on an AI board. In the AI Camera, a small image signal processor (ISP) crops and scales the image into an input tensor, the grid of numbers a model expects, and the accelerator beside it produces output tensors that contain the inferencing results.
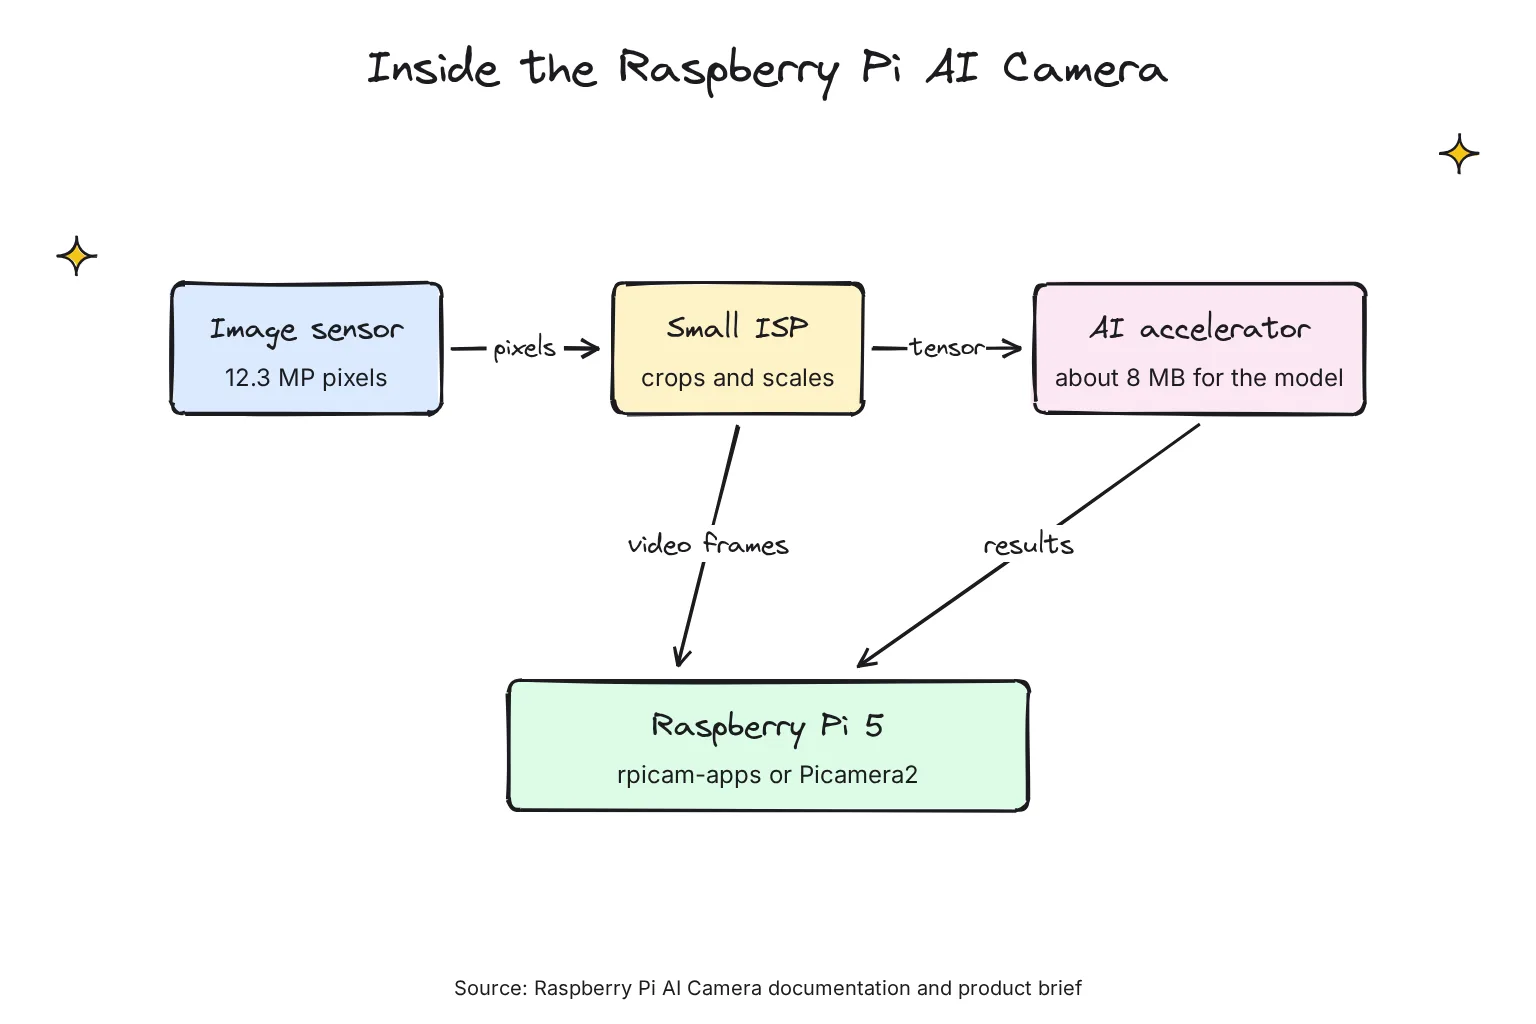
The Pi then receives both an image stream and an inference stream, matched frame by frame, so there is no need for an external accelerator, nor for the Raspberry Pi to run neural network software on the CPU. Sony describes the IMX500 as a pixel chip stacked on a logic chip with an AI DSP and memory for the model, and claims 3.1 milliseconds for MobileNet V1, a small image model.
A region of interest (ROI) setting picks which part of the sensor image is cropped out before being rescaled, handy for watching only a doorway. Models load as firmware at startup; the board's RP2040 caches firmware files in on-board storage, and a Pi 5 uploads them over a much faster custom two-wire protocol.
How is it different from the AI HAT+?
The AI HAT+ carries a Hailo NPU (neural processing unit, a chip built for AI math), connects to a Raspberry Pi 5 using its PCIe port and uses the memory on a Raspberry Pi 5. The camera needs no extra board, but its whole model must fit in about 8 MB. HATs are rated in TOPS, trillions of operations per second, which our NPU and TOPS explainer puts in context; I found no TOPS figure for the AI Camera.
Which Raspberry Pi models does the AI Camera work with?
Any model with a camera connector. The setup guide assumes a Raspberry Pi 4 Model B or Raspberry Pi 5 and says other models, including the Zero boards, need only minor changes. A Pi 5 has the mini, 22-pin connector, so it needs a Standard-Mini camera cable, and either of its two camera ports works.
Raspberry Pi's camera guide says its cameras come with the Standard-Standard cable already attached, but Approved Reseller PiShop.us lists two 200mm cables (15 and 22 pin) with the AI Camera, so check the box before buying a mini cable.
What size is it, and will a Camera Module 3 case fit?
It measures 25 × 24 × 11.9 mm, and its PCB outline and mounting hole locations are identical to those of Raspberry Pi Camera Module 3, while the overall depth is greater. Camera Module 3 mounts line up, but a snug case may not close, and Raspberry Pi says the case should not be covered.
How do you set up the AI Camera on a Raspberry Pi 5?
These steps follow Raspberry Pi's AI Camera getting started guide on Raspberry Pi OS, with nothing to compile.
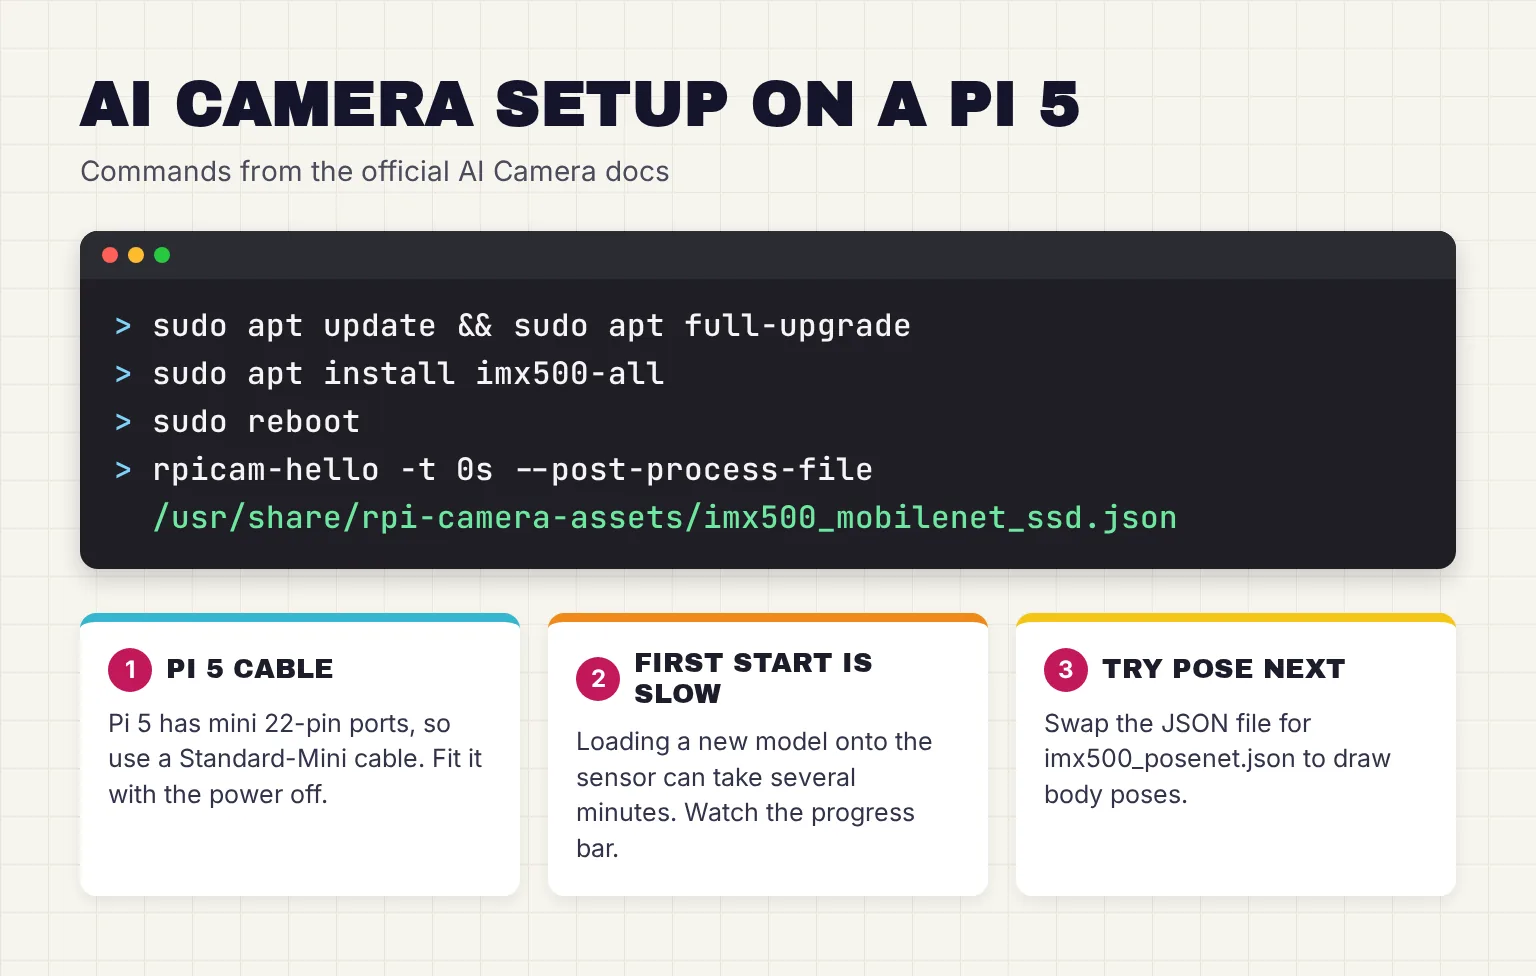
- Fit the camera with the power off. Open the flap on either Pi 5 camera port, insert the Standard-Mini cable with the metallic contacts facing away from the flap, and press the flap shut. If you use the Active Cooler, Raspberry Pi suggests connecting the camera cable before installing the cooler.
- Update the system with
sudo apt update && sudo apt full-upgrade. - Install the AI Camera software with
sudo apt install imx500-all. It installs the sensor firmware, model files, rpicam-apps stages and Sony's packaging tools. - Reboot with
sudo reboot. - Run the object detection demo below. The first load of a model might take several minutes, with a progress bar.
- Try pose estimation by swapping in
imx500_posenet.json, which draws lines between body joints.
sudo apt update && sudo apt full-upgrade
sudo apt install imx500-all
sudo reboot

# Object detection (MobileNet SSD)
rpicam-hello -t 0s --post-process-file /usr/share/rpi-camera-assets/imx500_mobilenet_ssd.json --viewfinder-width 1920 --viewfinder-height 1080 --framerate 30

# Pose estimation (PoseNet)
rpicam-hello -t 0s --post-process-file /usr/share/rpi-camera-assets/imx500_posenet.json --viewfinder-width 1920 --viewfinder-height 1080 --framerate 30

# Record 10 seconds of video with detection boxes
rpicam-vid -t 10s -o output.264 --post-process-file /usr/share/rpi-camera-assets/imx500_mobilenet_ssd.json --width 1920 --height 1080 --framerate 30
What do the demos show, and how do you tune them?
The detection demo draws labeled boxes, and all object detection runs directly on the AI Camera. For poses, the camera's output requires additional post-processing on your host Raspberry Pi. At launch, Raspberry Pi showed both performing inference on a 1080p video at 30fps.
To tune detection, edit a copy of imx500_mobilenet_ssd.json. It ships with max_detections at 5 and threshold at 0.6, the minimum confidence a box needs. To stop the smoothing of noisy output, remove the temporal_filter config block. Add -v 2 to print each detected object in the terminal, and -n to suppress the preview window entirely.
How do you use the AI Camera from Python with Picamera2?
Picamera2 is Raspberry Pi's Python camera library, pre-installed on Raspberry Pi OS images, but not on Raspberry Pi OS Lite images, where sudo apt install python3-picamera2 adds it. The guide then has you install OpenCV and munkres.
One snag: the guide still says to download the picamera2 repository, but the examples now live in picamera2-examples. Run them from its imx500 folder, because the detection demo opens assets/coco_labels.txt by a relative path.
sudo apt install python3-opencv python3-munkres
git clone https://github.com/raspberrypi/picamera2-examples.git
cd picamera2-examples/examples/imx500

python imx500_object_detection_demo.py --model /usr/share/imx500-models/imx500_network_ssd_mobilenetv2_fpnlite_320x320_pp.rpk
python imx500_pose_estimation_higherhrnet_demo.py
The Python demo applies no additional hysteresis or temporal filtering, so its boxes flicker more; its --threshold defaults to 0.55.
Which models come with the AI Camera?
Raspberry Pi's model zoo lists 23 reference models for classification (naming the main thing in view), object detection (boxing things), segmentation (labeling every pixel) and pose estimation (finding body joints). The imx500-all package installs all but two of them: in October 2026 its imx500-models package leaves out the two YOLO detectors and adds the PoseNet model the pose demo uses. Detectors use COCO's 80 classes and classifiers ImageNet's 1000 classes.
Scores are the zoo's own, after quantization; mAP, mIoU and top-1 are accuracy measures where higher is better.
| Task | Model | Input size | Accuracy | License |
|---|---|---|---|---|
| Detection | SSD MobileNetV2 FPN Lite (the default demo) | 320 × 320 | 0.218 mAP | MIT |
| Detection | YOLOv8n (GitHub only) | 640 × 640 | 0.279 mAP | AGPL-3.0 |
| Detection | NanoDet Plus | 416 × 416 | 0.332 mAP | Apache 2.0 |
| Detection | YOLO11n (GitHub only) | 640 × 640 | 0.374 mAP | AGPL-3.0 |
| Classification | EfficientNetV2-B2 | 260 × 260 | 77.7% top-1 | Apache 2.0 |
| Segmentation | DeepLabv3Plus | 320 × 320 | 0.721 mIoU | MIT |
| Pose estimation | HigherHRNet | 288 × 384 | 0.188 mAP | MIT |
Models marked pp run their post-processing on the IMX500 Edge AI Processor too, leaving less work for the Pi.
Can the Raspberry Pi AI Camera run YOLO?
Yes, two small ones: YOLO11n, the zoo's best scorer, and YOLOv8n. Both carry the AGPL-3.0 license, so read its terms before building a product. Neither is in the imx500-models package, so the zoo's command, which points at /usr/share/imx500-models/, fails on a standard install. From the imx500 examples folder, download the file from the zoo and run the command with the new path:
wget https://raw.githubusercontent.com/raspberrypi/imx500-models/main/imx500_network_yolo11n_pp.rpk
python imx500_object_detection_demo.py --model imx500_network_yolo11n_pp.rpk --bbox-normalization --bbox-order xy
How do you run your own model on the AI Camera?
You can, within tight limits. Raspberry Pi's route is to quantize and compress the model, convert it, then package it into a firmware file. Quantization stores a model's numbers as small integers so it fits: the camera takes int8 or uint8 input up to 640 × 640 and has 8,388,480 bytes for firmware, network weight file, and working memory. The first two stages normally run on a desktop PC or server, but you must run the final packaging step on a Raspberry Pi.
- Start with a trained model in PyTorch or TensorFlow. Sony's minimum for the tools is 4 GB of RAM, Python 3.11 and JVM 17, with a Linux PC recommended.
- Install Edge-MDT, Sony's Edge AI Model Development Toolkit, with
pip install edge-mdt[pt]for PyTorch orpip install edge-mdt[tf]for TensorFlow. Version 1.3.0 came out on April 23, 2026 and was tested with PyTorch 2.3-2.6 and TensorFlow 2.14-2.15. - Quantize the model with the Model Compression Toolkit (MCT), included in Edge-MDT, which exports Keras (TensorFlow) or ONNX (PyTorch) files.
- Convert it with
imxconv-ptorimxconv-tf;--no-input-persistencymakes optimal use of the memory available to the accelerator. The output includes a memory report andpackerOut.zip. - Package it on the Pi with
imx500-packagefrom the imx500-tools package. It creates a file named network.rpk, which you pass as the--modelof a Picamera2 script or thenetwork_fileof an rpicam-apps JSON file.
# On the PC (PyTorch route)
pip install edge-mdt[pt]
imxconv-pt -i <compressed ONNX model> -o <output folder>

# On the Raspberry Pi
sudo apt install imx500-tools
imx500-package -i <path to packerOut.zip> -o <output folder>
The hard part comes last: your app must decode the model's output. A detector shaped like the zoo's can reuse the demo script with --labels; anything else needs your own code.
Sony also offers AITRIOS services with, in its words, a no-code environment to create your own classifier, detector, and anomaly detection AI models. They are separate from Raspberry Pi's free tools, so read the terms before uploading training images.
What can you build with the AI Camera?
Three projects suit our reader, all built from official examples and all offline once installed.
A people counter for a doorway
Sony's Application Module Library (modlib) is a Python SDK for IMX500 apps. Its counter example pairs the SSD detector with a tracker, keeps only class 0 (person) and shows a running total, counting each tracked person once they have been seen for more than 20 frames.
Install modlib 1.5.0 in a virtual environment whose Python matches the system Python: 3.11 on Bookworm, 3.13 on Trixie.
python -m venv .venv
source .venv/bin/activate
pip install modlib
A detection-triggered porch or doorbell camera
To record only when a person appears, join two official Picamera2 examples. The AI Camera detection demo reads boxes, scores and classes from each frame. The circular recording example keeps the last few seconds in memory, so each clip starts just before the trigger.

Untested sketch: I have not run this code. It combines calls from those two files, so treat it as a starting point and test it at your own door before you rely on it.
# UNTESTED SKETCH: combines two official Picamera2 examples
import time
from picamera2 import Picamera2
from picamera2.devices import IMX500
from picamera2.encoders import H264Encoder
from picamera2.outputs import CircularOutput2, PyavOutput

MODEL = "/usr/share/imx500-models/imx500_network_ssd_mobilenetv2_fpnlite_320x320_pp.rpk"
imx500 = IMX500(MODEL)  # must be created before Picamera2
picam2 = Picamera2(imx500.camera_num)
config = picam2.create_video_configuration(
    controls={"FrameRate": imx500.network_intrinsics.inference_rate}, buffer_count=12)
picam2.configure(config)
imx500.show_network_fw_progress_bar()
output = CircularOutput2(buffer_duration_ms=3000)
picam2.start_recording(H264Encoder(bitrate=1000000, repeat=True), output)

recording, last_seen = False, 0
while True:
    outputs = imx500.get_outputs(picam2.capture_metadata(), add_batch=True)
    if outputs is None:
        continue
    scores, classes = outputs[1][0], outputs[2][0]
    if any(s > 0.55 and int(c) == 0 for s, c in zip(scores, classes)):  # 0 = person
        if not recording:
            output.open_output(PyavOutput(f"{int(time.time())}.mp4"))
            recording = True
        last_seen = time.time()
    elif recording and time.time() - last_seen > 5:
        output.close_output()
        recording = False
A wildlife or pet camera
The default detector's labels include bird, cat, dog, horse, sheep, cow and bear, enough to log a cat at the door. For species, the classifiers use ImageNet labels such as red fox, hedgehog, American robin and jay. A classifier names the main thing in view without boxing it, so set the ROI to crop to the feeder.
Can it be a home security camera?
It is a building block, not a finished system: the official software has demos and libraries, not an app with a timeline or remote viewing. To watch clips from your phone without opening the Pi to the internet, our home AI server guide explains the Tailscale route.
How private is the AI Camera?
Frames and detections stay on your Pi unless your own code sends them somewhere; the official demos only show a preview or write local files. Sony says image data never leaves the chip, unless you want it to, but on a Pi the camera also sends ordinary video, so privacy depends on what your script saves.
Three habits help. Log counts as text where no clip is needed. Blur faces before saving, as modlib's face blur example does with PoseNet. And delete the save_input_tensor block, a debugging option that names a file under /home/pi, from your JSON copy. For the wider picture, see our guide to private AI options.
AI Camera vs AI HAT+ vs the Pi's CPU for vision
This table compares routes for one camera on a Pi 5 in October 2026. Each price cell gives Raspberry Pi's US list price, then the price at PiShop.us, one of Raspberry Pi's official Approved Resellers, checked on October 27 and 28, 2026, before tax and shipping. HAT routes also need a camera, such as the Camera Module 3, available from $25.
| Route | Price: list / PiShop.us | AI speed (official) | Model limits | Works with | Setup |
|---|---|---|---|---|---|
| AI Camera | $70 / $74.95 | No TOPS figure; launch demos ran on 1080p video at 30fps | About 8 MB in total; input up to 640 × 640 | All Raspberry Pi models | One ribbon cable; imx500-all |
| AI HAT+ 13 TOPS | $70 at launch / $76.95, plus camera | 13 TOPS (Hailo-8L, INT8) | Uses Pi 5 memory; no LLMs | Raspberry Pi 5 | PCIe ribbon, spacers; hailo-all |
| AI HAT+ 26 TOPS | $110 at launch / $119.95, plus camera | 26 TOPS (Hailo-8, INT8) | Larger networks and parallel models | Raspberry Pi 5 | Same as 13 TOPS |
| AI HAT+ 2 | $200 / $200.00, plus camera | 40 TOPS (INT4), 20 TOPS (INT8) per Hailo; vision comparable to the 26 TOPS AI HAT+ | 8 GB onboard; small LLMs, up to about 6 billion parameters by Raspberry Pi's figure | Raspberry Pi 5 | Heatsink; hailo-h10-all |
| Pi CPU only | Camera from $25 / $29.25 | No official figure | TensorFlow Lite models in Pi memory | Any Raspberry Pi | Build rpicam-apps, or Python with ai-edge-litert |
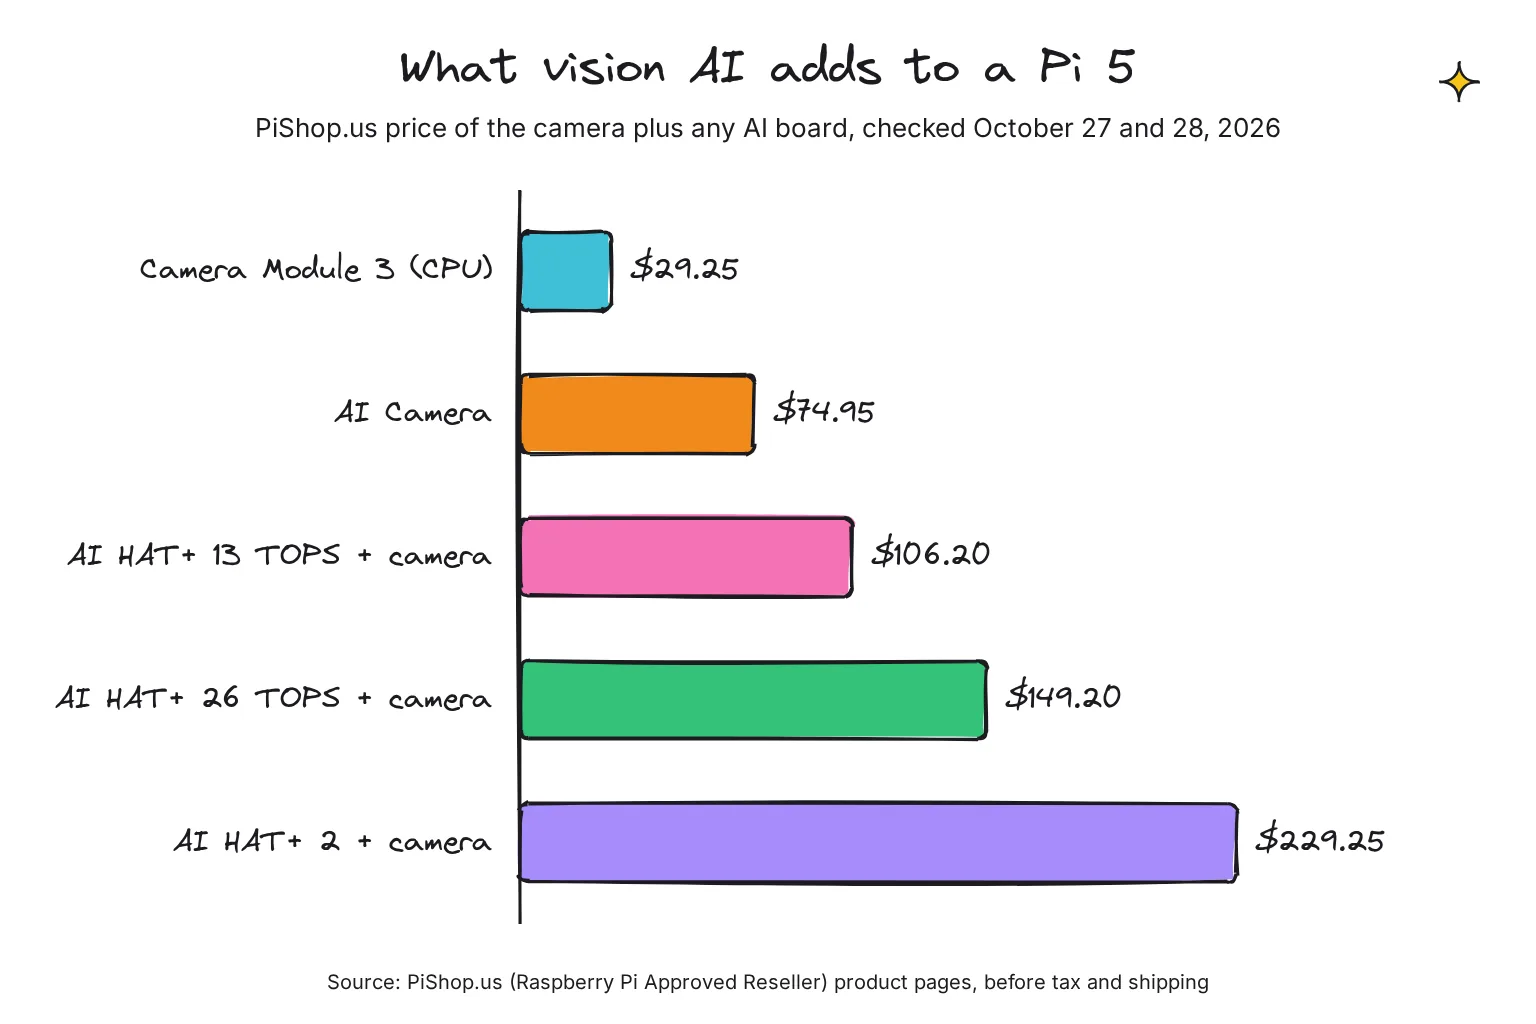
At PiShop.us, adding a $29.25 Camera Module 3 brings the HAT routes to $106.20, $149.20 and $229.25, against $74.95 for the AI Camera. The AI HAT+ launched at $70 and $110 in October 2024, and its product page still says from $70. The AI HAT+ 2 launched at $130 on January 15, 2026, rose $50 in Raspberry Pi's April 1, 2026 round of memory-driven price increases, and now lists at $200 on its product page and July 2026 product brief; I found no announcement for the last $20.
For several cameras or heavier models, our AI HAT+ comparison helps you pick a board.
What are the AI Camera's limits?
Small models only. Everything must fit in about 8 MB with 8-bit inputs, and the zoo's best detector scores 0.374 mAP, so expect missed and wrong boxes. Test on your own scene before you trust an alert.
No language models. It cannot run an LLM (large language model). Chat runs on the Pi 5's processor or the AI HAT+ 2, as the Raspberry Pi AI hub explains.
Weather and heat. Raspberry Pi rates it for 0°C to 50°C and says do not expose to water or moisture, so outdoor use needs a ventilated, weatherproof enclosure.
Power. I found no power figure for the AI Camera. Raspberry Pi's troubleshooting notes say a Camera Module adds about 200-250mA and suggest a different power supply if a camera misbehaves.
Focus. It is manual from 20 cm, so set it once for the distance you watch.
Does the Raspberry Pi AI Camera work at night?
Only with visible light. It has an integrated IR cut filter and is not infrared sensitive, and Raspberry Pi lists no NoIR version, so infrared lamps will not help. Use a porch or garden light.
Common questions about the Raspberry Pi AI Camera
How much does the Raspberry Pi AI Camera cost?
Raspberry Pi lists it at $70, the same as at its September 2024 launch, and Approved Reseller PiShop.us charged $74.95 on October 27 and 28, 2026. That buys the Sony IMX500 sensor with its built-in AI accelerator, so no AI HAT is needed, and Raspberry Pi says it will stay in production until at least January 2028.
Does the AI Camera work with the Raspberry Pi 5?
Yes. It works with every Raspberry Pi that has a camera connector, including the Pi 5, Pi 4 and Zero boards. The Pi 5 uses the mini 22-pin connector, so it needs a Standard-Mini cable, and Approved Reseller PiShop.us lists both a 15-pin and a 22-pin cable with the AI Camera.
What can the Raspberry Pi AI Camera detect?
Its bundled detectors find the 80 everyday COCO classes, including people, cars, cats, dogs and birds. Bundled classifiers name 1,000 ImageNet categories, and other models handle pose estimation and segmentation. You can also load your own small model.
Can the AI Camera run an LLM or a chatbot?
No. It has about 8 MB of memory for firmware, model weights and working data, enough only for small vision models. For chat on a Raspberry Pi, use the Pi 5 processor or the AI HAT+ 2, which has 8 GB of memory.
Should I buy the AI Camera or the AI HAT+?
Buy the AI Camera for one smart camera, for a Pi older than the Pi 5, or if you own no camera yet, since it lists at $70 with the AI built in. Choose an AI HAT+ for larger models or several cameras.
Does the AI Camera send video to the cloud?
No. Inference runs on the camera and results go to your Raspberry Pi over the ribbon cable, so nothing goes online unless your own code sends it. The official demos only show a preview or save files locally.
My verdict for a Pi 5 hobbyist: start with the AI Camera
For one private smart camera that spots people, pets or cars, the AI Camera is the right first buy. It lists at $70 ($74.95 at PiShop.us), needs no HAT, runs its detector on the sensor and takes four commands to set up. Move to an AI HAT+ only for several cameras or bigger models, and to the AI HAT+ 2 only if you also want a chat model on the board.
Your next step: install imx500-all, run the detection demo, and watch the doorway you care about for an evening to see what it catches and misses. Then return to the Raspberry Pi AI hub for your next project.
Sources
- Raspberry Pi AI Camera - Raspberry Pi
- AI Camera documentation - Raspberry Pi
- Raspberry Pi AI Camera on sale now at $70 - Raspberry Pi
- Raspberry Pi AI HAT+ product brief - Raspberry Pi
- AI HATs documentation - Raspberry Pi
- Raspberry Pi AI Camera (IMX500) Model Zoo - raspberrypi, GitHub
- Camera software - Raspberry Pi
- Raspberry Pi AI Camera product brief - Raspberry Pi
- Camera Module hardware - Raspberry Pi
- Raspberry Pi AI Camera - PiShop.us
- Sony to Release World's First Intelligent Vision Sensors with AI Processing Functionality - Sony
- Camera Module software and installation - Raspberry Pi
- Raspberry Pi Camera Cable - Raspberry Pi
- imx500_mobilenet_ssd.json - raspberrypi/rpicam-apps, GitHub
- imx500_object_detection.cpp - raspberrypi/rpicam-apps, GitHub
- picamera2 README - raspberrypi, GitHub
- picamera2-examples - raspberrypi, GitHub
- imx500_object_detection_demo.py - raspberrypi/picamera2-examples, GitHub
- imx500-models package files - Raspberry Pi apt archive
- edge-mdt: Edge AI Model Development Toolkit - PyPI
- AITRIOS for the Raspberry Pi AI Camera - Sony Semiconductor Solutions
- Application Module Library (modlib) - Sony Semiconductor Solutions, GitHub
- counter.py example - Sony Semiconductor Solutions, GitHub
- object_counter.py - Sony Semiconductor Solutions, GitHub
- modlib - PyPI
- capture_circular_improved.py - raspberrypi/picamera2-examples, GitHub
- imagenet_labels.txt - raspberrypi/picamera2-examples, GitHub
- blur_face.py example - Sony Semiconductor Solutions, GitHub
- Approved Resellers - Raspberry Pi
- Raspberry Pi Camera Module 3 - Raspberry Pi
- Introducing the Raspberry Pi AI HAT+ with up to 26 TOPS - Raspberry Pi
- Raspberry Pi AI HAT+ 13 TOPS - PiShop.us
- AI software - Raspberry Pi
- Raspberry Pi AI HAT+ 26 TOPS - PiShop.us
- Raspberry Pi AI HAT+ 2 - Raspberry Pi
- Raspberry Pi AI HAT+ 2 - PiShop.us
- Hailo-10H AI Accelerator - Hailo
- Raspberry Pi Camera Module 3 - PiShop.us
- tensorflow/real_time.py - raspberrypi/picamera2-examples, GitHub
- Raspberry Pi AI HAT+ - Raspberry Pi
- Introducing the Raspberry Pi AI HAT+ 2: Generative AI on Raspberry Pi 5 - Raspberry Pi
- A new 3GB Raspberry Pi 4 for $83.75, and more memory-driven price increases - Raspberry Pi
- Raspberry Pi AI HAT+ 2 product brief - Raspberry Pi
- Camera troubleshooting (documentation source) - raspberrypi/documentation, GitHub