How do you install ComfyUI?
For most people, the answer is to install the free Comfy Desktop app, which sets up Python and ComfyUI for you on Windows 10 or later and Apple Silicon Macs. Pick the Windows portable build if you want a folder you extract and run, and a manual install if you want full control or use Linux.
This guide follows one reader: someone with a Windows 11 PC and an NVIDIA RTX 3060 with 12GB of VRAM (video memory, the graphics card's own memory), who has never used Python. Where Macs, AMD and Intel cards differ, I say so.
Choose Comfy Desktop if:
- You want an installer, not a terminal. ComfyUI's own README calls it the easiest and best way to use ComfyUI for new users.
- You want one-click updates and automatic snapshots, saved copies of your setup that you can roll back to if an update breaks something.
- You use a Mac: the Desktop app needs macOS 13 or later on an M1 or newer chip.
Choose the Windows portable build if:
- You want everything, including its own Python, in one folder you only need to extract.
- You are happy to move model files into folders yourself. The README says the portable build is not recommended for regular users.
Choose a manual install or comfy-cli if:
- You run Linux on a server or need a GPU the packaged builds skip: manual installs support NVIDIA, AMD, Intel, Apple Silicon, Ascend NPU and Cambricon MLU.
- You want headless use. The Desktop app does not support headless or server mode.

What is ComfyUI, and what are you actually installing?
ComfyUI is a free, open-source program for making images, video, audio and 3D with AI models, under the GNU GPL version 3. You build each job as a visual node graph: boxes called nodes, each doing one step, wired together into a workflow. It runs on your machine and shows its interface in a browser tab or app window.
Every install has three layers: ComfyUI itself; a Python environment, including PyTorch, the math library that talks to your graphics card; and the models, separate multi-gigabyte downloads. Whichever version you use, it runs in a separate Python environment. Still choosing an image app? Our guide to making AI images on your own computer compares ComfyUI with simpler tools.
Once installed, the core program runs fully offline and does not download anything unless you request it.
ComfyUI install options compared in October 2026
ComfyUI ships often: the README describes a weekly release cycle targeting Monday. The current release is ComfyUI v0.43.0, released October 27, 2026, and the Desktop app is at v1.1.8, released October 22.
| Option | Version, October 2026 | Systems and graphics cards | How it updates | Best for |
|---|---|---|---|---|
| Comfy Desktop | v1.1.8 (October 22) | Windows 10+ (x64 or ARM64) and macOS 13+ on Apple Silicon; the docs also list Linux packages, the ComfyUI README does not; picks an NVIDIA, AMD, Intel Arc or CPU build | App updates itself; ComfyUI from the Manage panel | Beginners on Windows and Mac |
| Windows portable | Attached to GitHub releases, now v0.43.0 | Windows only; separate NVIDIA, AMD and Intel downloads | Scripts in its update folder | Windows users who want one movable folder |
| Manual git install | Any ComfyUI version you choose | Windows, macOS, Linux; all supported GPU types | git pull, then reinstall requirements | Linux, servers and tinkerers |
| comfy-cli | v1.23.0 (October 20) | Any system with Python 3.10 or newer; asks which GPU you have | comfy update | Terminal users who want shortcuts |
| Stability Matrix (third-party) | v2.16.5 (October 21) | Windows 10 and 11, Linux AppImage, Arch AUR, Apple Silicon Macs | One-click, inside the app | Running ComfyUI beside other image apps |
Desktop installs track the stable ComfyUI release by default, while portable and git installs can follow every new commit. Stable is right for a first install.
Which ComfyUI portable download do I need?
The v0.43.0 release lists five Windows portable files, each a .7z archive (a compressed folder):
ComfyUI_windows_portable_nvidia.7z, 1.9 GB: NVIDIA 20 series and above, with CUDA 13.0 and Python 3.13. This is the one for an RTX 3060.ComfyUI_windows_portable_nvidia_cu126.7z, 1.8 GB: CUDA 12.6 and Python 3.12, for NVIDIA 10 series and older only.ComfyUI_windows_portable_nvidia_arm64.7z, 1.75 GB: Windows on ARM with an NVIDIA GPU.ComfyUI_windows_portable_amd.7z, 1.54 GB, andComfyUI_windows_portable_intel.7z, 1.37 GB: AMD and Intel graphics cards, started withrun_amd_gpu.batorrun_intel_gpu.bat.
Is Stability Matrix a good way to install ComfyUI?
It suits people who want several image apps. Stability Matrix, from Lykos AI rather than Comfy Org, installs and updates ComfyUI alongside Forge, Fooocus, InvokeAI, SwarmUI and others, with embedded Git and Python and one shared model folder. Its source is AGPL-licensed, but its binaries come under an end user license agreement. For ComfyUI alone, I would use the official Desktop app.
What are the ComfyUI system requirements?
- Graphics card: a dedicated NVIDIA or AMD GPU is recommended for good performance, but not required. Without one, ComfyUI runs on the processor with
--cpu, which the docs call slower. - VRAM: the docs set no minimum. ComfyUI says it can run even the biggest open models on as low as 4GB VRAM plus 8GB RAM by streaming model weights in and out, which is the maker's own claim.
- System memory: 8 GB minimum, 16 GB recommended for the Desktop app.
- Disk space: at least 4.85 GB per Desktop installation, plus models; the first model in this guide adds 12.2 GB. The wizard strongly recommends an SSD.
- NVIDIA driver: the portable build ships with PyTorch for CUDA 13.0, NVIDIA's GPU computing toolkit, and CUDA 13 programs need driver version 580 or newer. Desktop warns you if your driver is older than 580.
- Python: only for manual installs, where 3.13 is recommended, with 3.12 as a fallback. Desktop and portable bring their own.
- Browser: Google Chrome 143 or later is recommended.
Will ComfyUI run on an RTX 3060 12GB?
Yes. NVIDIA sells the RTX 3060 with 12 GB or 8 GB of GDDR6 memory, and lists the RTX 30 series as Ampere, the generation after Turing. So it suits the main NVIDIA portable build and ComfyUI's int8 support, which since v0.27.0 works on Turing GPUs and newer.
Int8 is a quantization: storing the model's numbers in fewer bits, so the file is smaller. For more on why VRAM matters, see our plain-English guide to CPUs, GPUs and AI PCs.
Does ComfyUI work on a Mac, AMD or Intel GPU?
On an M1 or newer Mac, use the Desktop app; ComfyUI uses Apple's Metal graphics through PyTorch and does not use MLX directly. On Windows with AMD, use Desktop or the AMD portable; manual installs need Windows 11 and an RDNA 2, 3, 3.5 or 4 card. Intel Arc cards run through PyTorch's XPU backend, not CUDA.
How to install the ComfyUI Desktop app on Windows
This is the route I recommend for the RTX 3060 reader. The standalone install does not require admin rights on Windows.
- Update your NVIDIA driver. The NVIDIA App downloads the latest Game Ready and Studio drivers. What matters here is a version number of 580 or newer.
- Download and run the installer. Get it from comfy.org/download, which detects your system, then run the .exe and launch Comfy Desktop from the Start Menu.
- Choose Local, not Cloud. Local installs ComfyUI on this machine and runs offline; Cloud runs it on Comfy's servers. Tick the terms box. Usage sharing and beta features are optional and ticked by default, so clear them if you prefer.
- Check the install settings. Leave Express Install off to see the wizard. Keep Release on Stable (Recommended) and Hardware on NVIDIA, and choose an SSD folder outside OneDrive, which the wizard refuses.
- Wait for the install. It downloads ComfyUI, builds a Python environment, then updates to the latest stable release, which can take an hour or more on a cold machine.
- Pick a starter template. Desktop then opens the template library; the first-image section below says which to pick.
On a Mac, open the .dmg, drag Comfy Desktop to Applications, and if macOS blocks it, go to System Settings, Privacy and Security, and click Open Anyway.
Linux is where Comfy's own pages disagree. The Desktop Linux guide lists official .deb and AppImage packages for x64, and the Comfy Desktop README gives the same install commands, while the ComfyUI README still lists the Desktop app for Windows and macOS only. If you try the packages, the guide installs them like this:
sudo apt install ./*.deb

# or, for the AppImage:
chmod +x ./*.AppImage
./*.AppImage
How to install ComfyUI Portable on Windows
The portable build is a ready-made folder with its own Python, called python_embeded (the misspelling is in the real folder name). Comfy Org describes it as a self-contained build you can run from any folder.
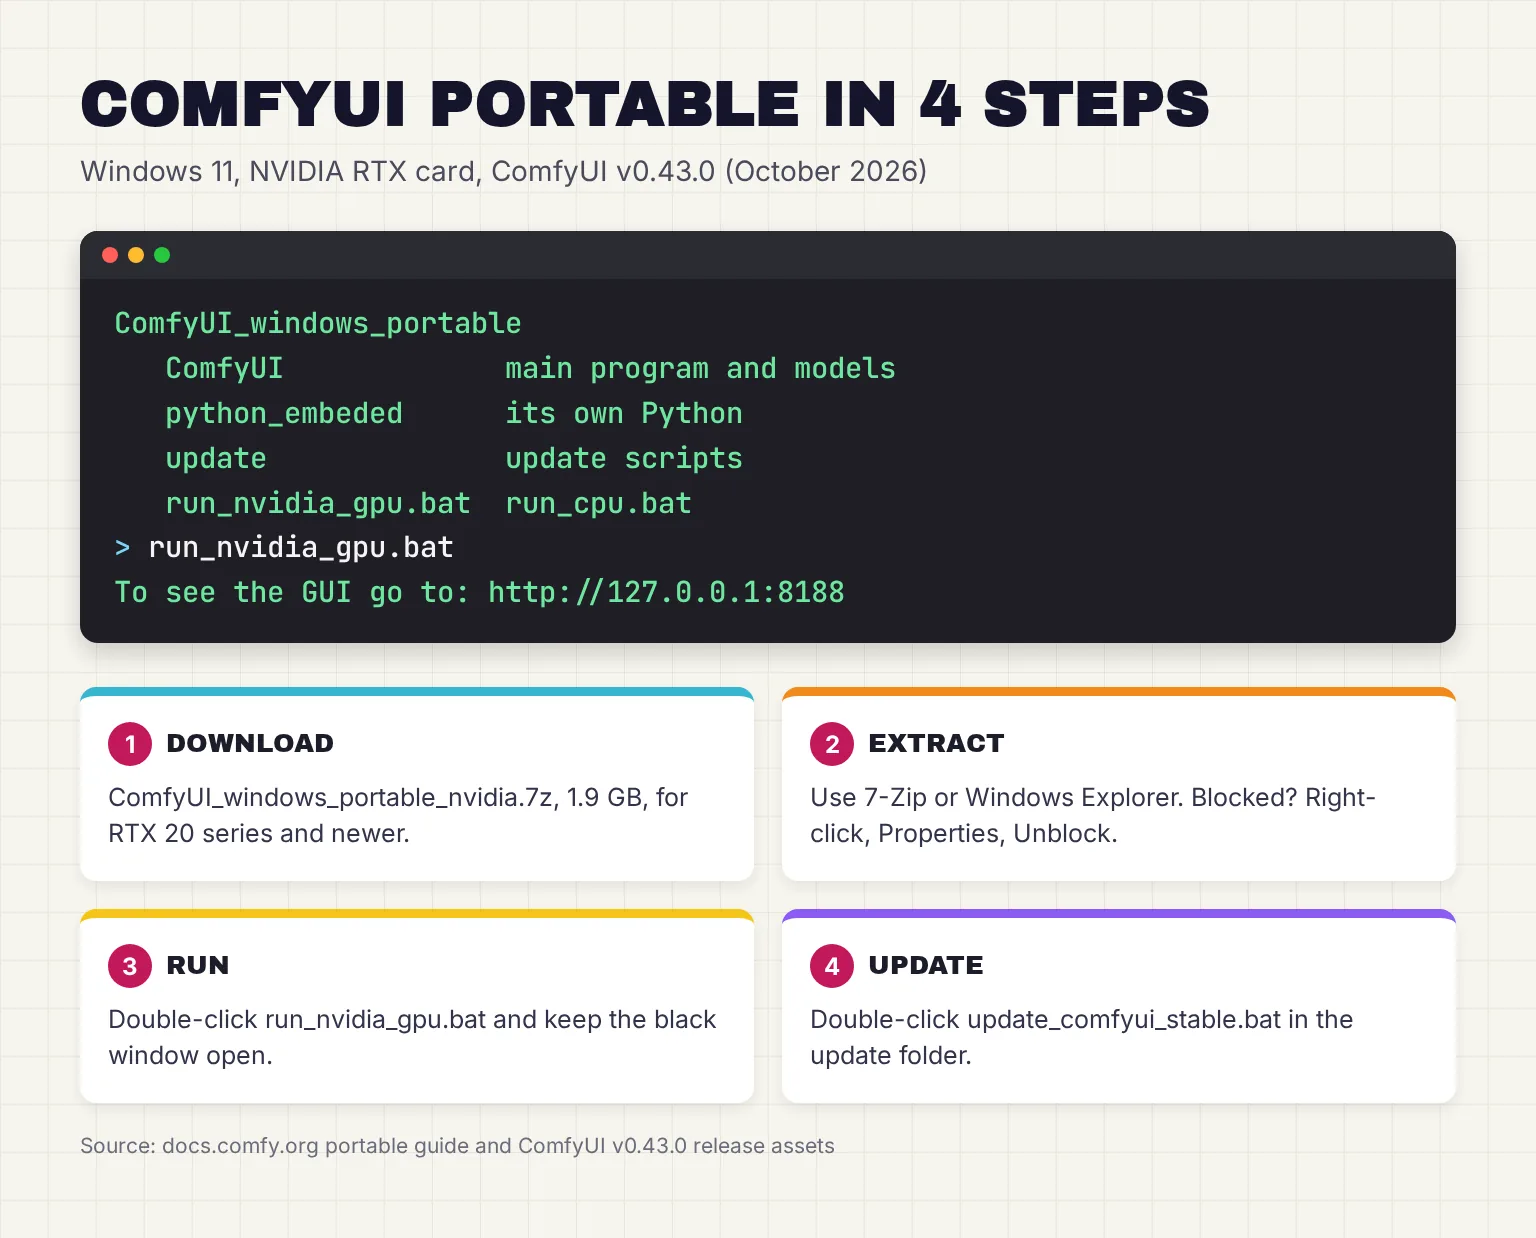
- Download the NVIDIA build. Get
ComfyUI_windows_portable_nvidia.7zfrom the latest release, and update your NVIDIA driver to 580 or newer first. - Extract it. Use 7-Zip or, per the README, Windows Explorer on recent Windows versions. If extraction fails, right-click the file, choose Properties and tick Unblock.
- Start ComfyUI. Open the extracted
ComfyUI_windows_portablefolder and double-clickrun_nvidia_gpu.bat. A black command window appears. - Open the interface. When the window shows
To see the GUI go to: http://127.0.0.1:8188, your browser usually opens that page. If not, type the address yourself, and do not close the command window, or ComfyUI stops and the page keeps showing Reconnecting.
In v0.43.0, run_nvidia_gpu.bat runs one command:
.\python_embeded\python.exe -s ComfyUI\main.py --windows-standalone-buildIf nothing starts, the file tells you to update your NVIDIA driver, or install the Microsoft Visual C++ Redistributable for a c10.dll error. A red error in the interface usually means you still need a model.
How to install ComfyUI manually on Linux
A manual install uses git, the tool for downloading code repositories, and a virtual environment, a private Python folder for ComfyUI's libraries. These NVIDIA commands come from the comfy-cli guide (first two lines) and the manual install guide; use Python 3.13 or 3.12.
python3 -m venv comfy-env
source comfy-env/bin/activate
git clone https://github.com/Comfy-Org/ComfyUI.git
pip install torch torchvision torchaudio --extra-index-url https://download.pytorch.org/whl/cu130
cd ComfyUI
pip install -r requirements.txt
python main.py
For AMD on Linux, the manual install guide swaps the PyTorch line for pip3 install torch torchvision torchaudio --index-url https://download.pytorch.org/whl/rocm7.2.
comfy-cli does much of this for you. pip install comfy-cli followed by comfy install asks which GPU you have and installs the matching PyTorch build, placing ComfyUI in a folder called comfy in your home directory by default. Start it with comfy launch.
Your first model and first image in ComfyUI
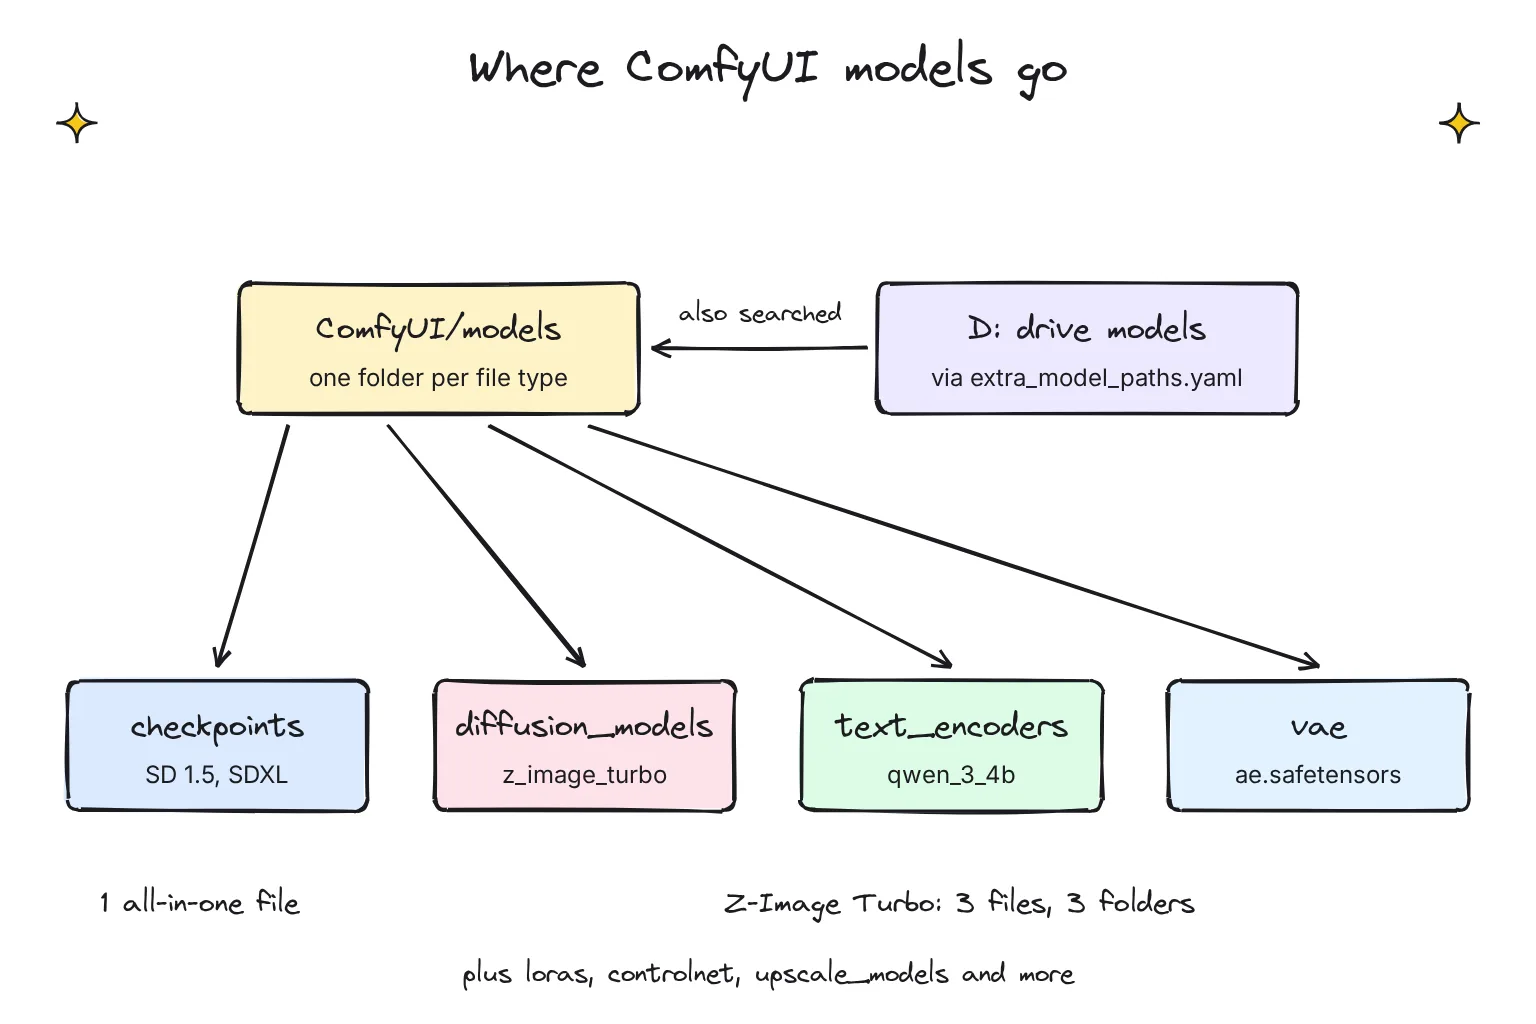
Most installs include no base model, so the first launch shows missing files. A checkpoint is one all-in-one model file. Newer models are split into a diffusion model, which draws the image; a text encoder, which turns your prompt into numbers; and a VAE, which turns the result into pixels.
Where do model files go in ComfyUI?
By default, models live in ComfyUI/models/, which has a subfolder for each type of file, from checkpoints and loras to diffusion_models, text_encoders and vae. In the portable build that is ComfyUI_windows_portable\ComfyUI\models\. Desktop downloads into a shared folder every installation uses, by default under %LOCALAPPDATA%\Comfy-Desktop\ComfyUI-Shared.
Which first model should you download?
The workflow that opens by default uses Z-Image Turbo, a 6-billion-parameter model from Alibaba's Tongyi Lab that makes an image in 8 steps and is Apache 2.0 licensed. That default workflow asks for three files: the 12.3 GB diffusion model, an 8.04 GB text encoder and a 335 MB VAE, about 20.7 GB in all.
On the RTX 3060 I would load the Z-Image-Turbo Int8 template instead. It uses the same 8-step, 1024 by 1024 recipe with smaller files: a 6.2 GB int8 diffusion model, a 5.63 GB FP8 text encoder and the same VAE, about 12.2 GB. The main file then fits inside 12GB of VRAM; the makers say the full model fits within 16G VRAM consumer devices.
On a slow connection or a small disk, the docs' own first-image example is Stable Diffusion 1.5, a single 2.13 GB checkpoint. Its model card warns that it is from 2022 and several major generational upgrades behind, so treat it as a test, not a keeper.

How to use ComfyUI to make your first image
- Open the templates. Click the Templates icon in the left sidebar, or choose Browse Templates from the ComfyUI logo menu or the View menu, then pick Z-Image-Turbo Int8: Text to Image.
- Download the missing models. Loader nodes turn red; open View details and click Download all. Desktop files them for you; in the portable build, move each browser download into the folder shown.
- Refresh. After placing files by hand, press R to refresh the model lists in the loader nodes.
- Write a prompt and run. Type a description in the prompt box, then click Run or press Ctrl + Enter.
- Save the result. The picture appears in the Save Image node; right-click it to save. ComfyUI also writes every result to its
outputfolder.
For prompt tips, see our beginner's guide to local AI images. To enlarge your best results, try a free local AI upscaler.
How do you update ComfyUI?
Each install type updates differently, per the official update guide.
| Install type | How to update ComfyUI | Watch out for |
|---|---|---|
| Comfy Desktop | Instance menu, Manage, Update tab: Update Now | The app itself checks every 10 minutes and installs updates automatically unless you turn that off |
| Windows portable | update\update_comfyui_stable.bat or update\update_comfyui.bat | Run update_comfyui_and_python_dependencies.bat only to fix dependency problems |
| Manual git install | git pull, then pip install -r requirements.txt | Activate the virtual environment first |
| comfy-cli | comfy update | comfy update all also updates custom nodes |
Desktop saves a snapshot before it updates, so you can restore it from the Snapshots tab if a custom node breaks.
For the portable build, update_comfyui.bat moves to the latest development commit and update_comfyui_stable.bat to the latest stable release. The readme recommends the first, but I would keep a beginner on stable. The dependency script can break custom nodes, so back up first.
On a manual install, the docs' commands are:
source venv/bin/activate
cd <ComfyUI-installation-path>
git pull
pip install -r requirements.txt
Change the first line to your environment's name, such as comfy-env above. Skipping the pip step often causes a missing or outdated interface after updates.
How do I keep models outside the ComfyUI folder?
Keeping models on, say, a roomy D: drive means you can reinstall or switch install types without downloading 20 GB again. In Desktop, open Desktop Settings, Storage, and click Add Shared Directory. For portable and manual installs, copy extra_model_paths.yaml.example in the ComfyUI folder, rename the copy to extra_model_paths.yaml and add your folder in the format the docs show:
my_custom_config:
    base_path: D:\ComfyUI-models\
    checkpoints: checkpoints
    diffusion_models: diffusion_models
    text_encoders: text_encoders
    vae: vae
    loras: loras
Each key is a folder type and each value a subfolder of base_path. Restart ComfyUI, which detects models in its own folders and in this file's paths at startup. Note that uninstalling Desktop does not remove your shared models.
What is Comfy Cloud, and do you need it?
Comfy Cloud is the official hosted version, with the same features as local ComfyUI and models pre-installed on NVIDIA RTX 6000 Pro GPUs, but no custom node packs of your own. New users get 5 free runs on real GPUs, then plans start at $20 a month, or $16 a month billed yearly, with Creator at $35 and Pro at $100 a month.
With a 12GB RTX 3060, you do not need it: local generation is free once the files are downloaded, and your prompts and images stay on your PC. Desktop's optional usage data never collects prompts or generated media. Cloud makes sense for big video models or a laptop with no graphics card. Our local vs cloud AI comparison covers the cost trade-off.
Common questions about installing ComfyUI
Is ComfyUI free?
Yes. ComfyUI is open source under the GPL version 3 license, and the Comfy Desktop app is free under AGPL 3.0 or later, with a commercial license available. Running it locally costs nothing beyond electricity. Comfy Cloud is the paid hosted option, and each model you download has its own license.
Should I use ComfyUI Desktop or Portable?
Use Comfy Desktop unless you have a reason not to. It installs Python for you, updates with one click, saves snapshots before updates and downloads models into the right folders. Choose Portable on Windows if you want a single self-contained folder and are happy to place model files yourself.
Where do I put models in ComfyUI?
Put them in the matching subfolder of ComfyUI/models: all-in-one checkpoints in checkpoints, and split models in diffusion_models, text_encoders and vae. The Desktop app downloads into a shared folder for you. To keep models on another drive, use extra_model_paths.yaml or the Desktop Storage settings.
Do I need to install Python for ComfyUI?
Not for the Desktop app or the Windows portable build, which both bring their own Python. You only need Python for a manual install or comfy-cli. The docs recommend Python 3.13, with 3.12 as a fallback, and a virtual environment so ComfyUI does not change your system Python.
Can ComfyUI run on a Mac?
Yes, on Apple Silicon. The Comfy Desktop app needs macOS 13 Ventura or later and an M1 chip or newer. ComfyUI uses PyTorch with Apple's Metal Performance Shaders backend for graphics acceleration, not MLX. The Windows portable build does not run on a Mac, but a manual install does.
How much disk space does ComfyUI need?
Each Desktop installation needs at least 4.85 GB, and the portable NVIDIA download is 1.9 GB before extraction. Models take far more: Z-Image Turbo needs about 12.2 GB in its int8 version or 20.7 GB in full. Leave room for several models on a fast SSD.
My verdict for an RTX 3060 PC: install Comfy Desktop
For the reader in this guide, Comfy Desktop is the right first install. It needs no Python knowledge, checks your NVIDIA driver, puts models in the right folders and snapshots your setup before every update. Choose the portable build only if you want a self-contained folder you manage by hand, and leave manual installs, comfy-cli and Stability Matrix until you have a reason.
Your next step: update your NVIDIA driver, install Comfy Desktop on an SSD with the Stable release, then load the Z-Image-Turbo Int8 template and let it download its 12.2 GB of models while you write your first prompt.
Sources
- Comfy Desktop Overview - Comfy Org
- ComfyUI Portable for Windows - Comfy Org
- Install ComfyUI Manually (Windows, macOS, Linux) - Comfy Org
- ComfyUI README - Comfy-Org/ComfyUI, GitHub
- Comfy Desktop FAQ - Comfy Org
- Comfy Desktop for macOS - Comfy Org
- System Requirements - Comfy Org
- ComfyUI LICENSE at v0.43.0 - Comfy-Org/ComfyUI, GitHub
- Release v0.43.0 - Comfy-Org/ComfyUI, GitHub
- Comfy Desktop v1.1.8 - Comfy-Org/Comfy-Desktop, GitHub
- Instance Management - Comfy Org
- comfy-cli - PyPI
- comfy-cli README - Comfy-Org/comfy-cli, GitHub
- Release v2.16.5 - LykosAI/StabilityMatrix, GitHub
- Stability Matrix README - LykosAI/StabilityMatrix, GitHub
- How to Update ComfyUI - Comfy Org
- Comfy Desktop for Windows - Comfy Org
- CUDA Toolkit Release Notes - NVIDIA
- GeForce RTX 3060 Family - NVIDIA
- Compare GeForce Graphics Cards - NVIDIA
- Changelog - Comfy Org
- NVIDIA App - NVIDIA
- Download ComfyUI - Comfy Org
- Comfy Desktop README - Comfy-Org/Comfy-Desktop, GitHub
- Comfy Desktop on Linux - Comfy Org
- 7-Zip - Igor Pavlov
- run_nvidia_gpu.bat at v0.43.0 - Comfy-Org/ComfyUI, GitHub
- Latest supported Visual C++ Redistributable downloads - Microsoft Learn
- README_VERY_IMPORTANT.txt at v0.43.0 - Comfy-Org/ComfyUI, GitHub
- Get Started with Comfy CLI - Comfy Org
- Getting Started with AI Image Generation - Comfy Org
- folder_paths.py at v0.43.0 - Comfy-Org/ComfyUI, GitHub
- Comfy Desktop Settings - Comfy Org
- Z-Image-Turbo in ComfyUI: 8-Step Text-to-Image - Comfy Org
- Tongyi-MAI/Z-Image-Turbo model card - Hugging Face
- Add a core route for the default workflow (#16956) - Comfy-Org/ComfyUI, GitHub
- z_image_turbo diffusion_models files - Comfy-Org, Hugging Face
- z_image_turbo text_encoders files - Comfy-Org, Hugging Face
- z_image_turbo vae files - Comfy-Org, Hugging Face
- image_z_image_turbo_int8.json - Comfy-Org/workflow_templates, GitHub
- Stable Diffusion v1.5 Archive - Comfy-Org, Hugging Face
- Templates - Comfy Org
- Managing Installations - Comfy Org
- extra_model_paths.yaml.example at v0.43.0 - Comfy-Org/ComfyUI, GitHub
- Comfy Cloud - Comfy Org
- Comfy Cloud pricing - Comfy Org